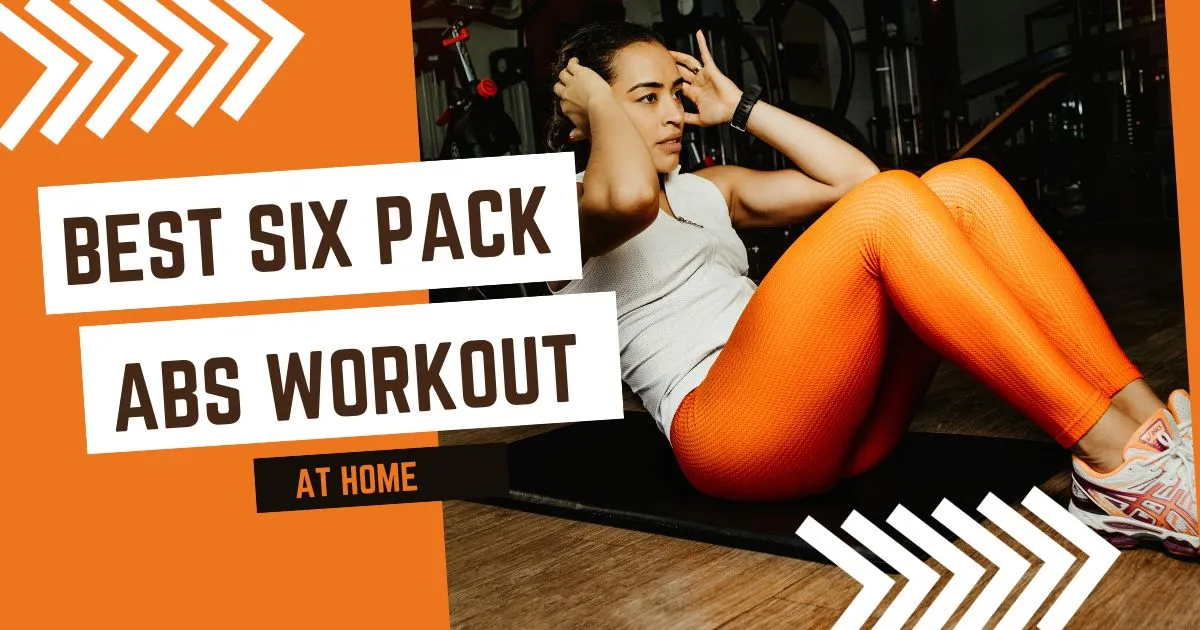
Hey are you looking for the “Best 6 pack abs workout at home” Then you are at the right place, we will take you on an exciting journey to help you get six pack abs or your desired personality with your six-pack abs from the comfort of your own home. We have a collection of simple and effective six-pack abs workouts at home. Keep in mind This blog is just for giving information we collected from different sources.
Ab exercises benefits
Building six-pack abs helps you not only with your visual appeal, and strong & toned abdominal muscles but also they help you on improving posture, lower back support, and overall core strength, making everyday activities easier and less painful. additionally, it’s a great way to boost your confidence!
In this blog, we listed some of the key exercises and routines that will help you to get those six-pack abs. So, if you’re ready to wave goodbye to that belly fat and say hello to a stronger, more defined core, let’s move to the top 10 “6 Pack Abs Workout at Home”. Stay connected for exercise tips, step-by-step instructions, and some sports-related information.
List of top 7 best 6 pack abs workout at home
Hardstyle plank
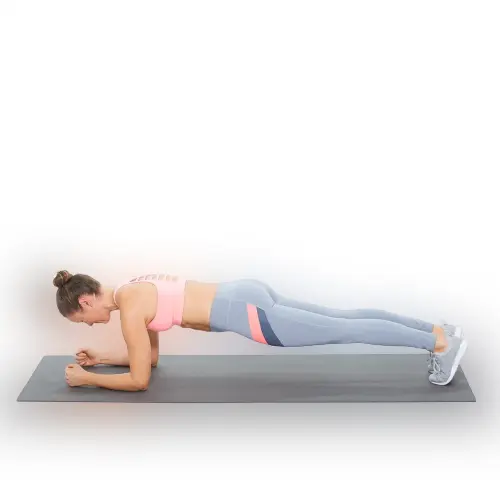
Plank is one of the most popular exercises and the first in our list of the Best 6 pack abs workout at home, the hard-style plank is a variation of the traditional plank exercise that focuses on full body tension and engagement of the core muscles. This exercise helps strengthen the core, improve posture, and enhance overall body stability. Following is how to perform hardstyle plank.
How to Perform the Hardstyle Plank:
Starting Position: start by taking a traditional plank position. With your elbow directly under your shoulders place your forearms on the ground. Remember your body should form a straight line from your head to your heels.
Hand Clasp: Instead of putting your palms flat on the ground, clasp your hand together in a fist, this will create tension in your upper body.
Tighten Your Core: Imagine you are trying to pull your belly button toward your spine to
Engage your core muscles this will create a feeling of tension and tightness in your midsection.
Squeeze Your Glutes:
Contract your glute (butt) muscles to further stabilize your lower body. This will also help maintain a neutral spine position.
keep your legs straight: try to keep your legs straight
Maintain Proper Alignment:
Keep your head in line with your spine, and make sure your neck is in a neutral position. Avoid letting your hips bend down or raising them too high.
Breathe: Avoid holding of your breath and remember to breathe steadily and deeply throughout the exercise.
Hold: Try to keep that posture maintaining proper tension as long as you can, if you are a beginner then start with 10- 15 seconds and slowly increase the duration.
Benefits of the Hardstyle Plank:
- Core Strength
- Full-Body Tension
- Improved Posture
- Enhanced Upper Body Strength
- Increased Mental Toughness
- Calorie Burn
People also read: 10 best exercises with amazing benefits
Dumbbell side bend
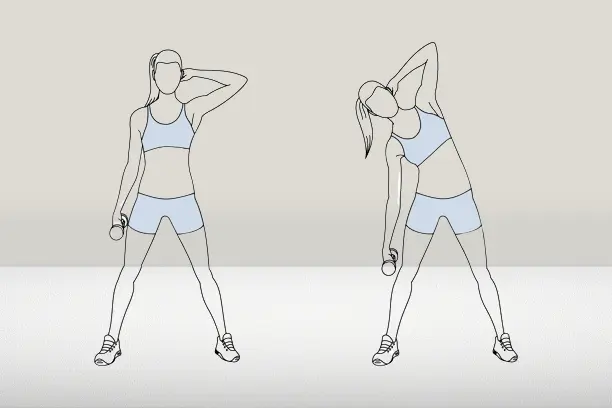
The second exercise in our list of Best 6 pack abs workout at home is “Dumbbell” side bend is an isolation exercise that basically focuses on the oblique muscles. Most people focus on doing regular crunches and other different exercises to strengthen their core but they do not focus on the oblique muscles. Oblique muscles are the muscles around our waistline. This exercise also helps in building 6 pack abs.
Dumbbell side bends can be performed with minimum equipment. If anyone does this with the right technique, it can help in increasing the strength of the oblique. Let’s know how to do this exercise step by step, we will also discuss some of the dumbbell side bends benefits.
How to Do Dumbbell Side Bends Exercise?
It is very important to perform exercises with the right form as that helps in preventing any injuries as well as in getting the maximum benefits from your workouts. Make sure you are using a comfortable weight and not too heavy for doing this exercise
Starting position: start by grabbing a dumbbell in your right hand and standing with your feet, your feet should be hip or shoulder-width apart. Keep a slight bend in your knees. Maintain a neutral head and neck position during the exercise.
Opposite hand behind your head: Place your left hand behind your head without pulling or putting any force on your head. Distribute your weight equally and grip the floor with your feet to create a stable position.
keep your palms facing forward(position A ): bring the dumbbell to the right side and remember to keep your palms facing forward. Your arm should be placed vertically and keep a slight bend at the elbow. Keep your shoulders and hips stable while engaging your core.
slowly bend your spine: keep the rest of your body still and slowly bend your spine to the right keep the dumbbell outside of your leg while bending. Bend until you reach just above your knee.
Back to the starting position: squeeze your left oblique and lateral core muscles and slowly, begin to pull your body back to position A.
Repeat: Slowly, straighten your spine to set up for another repetition. After completing the desired number of repetitions switch sides. Perform 3 sets of 10-15 repetitions of dumbbell side bends.
Benefits of Dumbbell Side Bends Exercise
- Increase your lateral strength
- Increase your core strength
- define your waistline
- Increases back strength
- Improve spinal mobility
Dead bug

One of the best exercises for your abs is a dead bug. Dead bug exercise is a bodyweight exercise that targets your abs. This exercise is done while lying on your back on the floor.
The back is kept in contact with the ground or met during the exercise and bending the knees at 90 degrees.in this exercise, the arms are also lifted straight upward maintaining a straight line to the shoulders. One arm is lowered to the floor, and the opposite leg is also extended to the floor. let’s find out how to perform the dead bug exercise
.
How to do a dead bug exercise: Step-by-step instructions
One thing to keep in mind while performing this exercise the midsection has to be stable and the motion should be controlled and slow. This is a bodyweight exercise that you can do with the help of the floor, to do this exercise comfortably use a yoga mat to lie on it.
- Starting position: Lie straight on the yoga mat to do the dead bug workout. straighten your arm above the chest perpendicular to the body maintaining a straight line to the shoulder. lift your knees and keep the knees at 90 degrees. The trunk, thighs, and shins should be at a right angle. This form is the start position of the dead bug.
- The next step: Now, move your left hand down towards the mat and at the same time lengthen your right hip and knee towards the mat. Keep the right leg and arm where you started. Make slow and steady movements when you extend and remember to breathe in.
- Repeat: repeat the same movement of extending the right hand and leg for the desired count
Do this workout for 5 repetitions on each side for 3 sets. When you have completed your sets, return the feet to the floor.
Benefits of a Dead Bug Exercise
- Improving the core strength
- Boosts coordination
- Easy and beneficial
- Loose weight
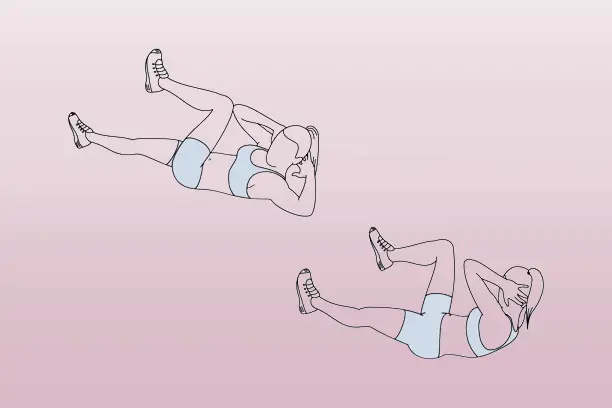
Russian twist
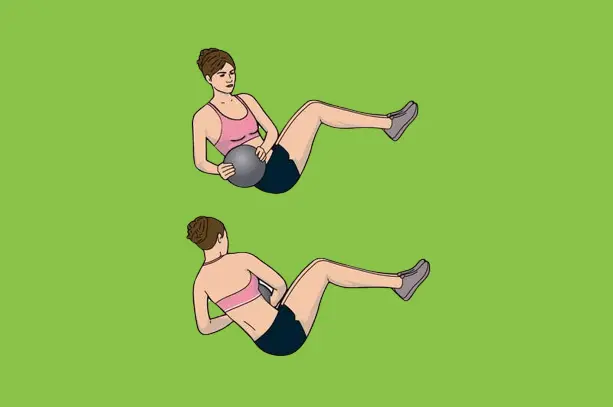
The next exercise in our list of Best 6 pack abs workout at home is Russian twist. The Russian twist is an abdominal exercise that targets your hips, core, and shoulders. This exercise is performed in a twisting motion and has several challenging variations.
It may look like a simple exercise, but Russian twists need a combination of strength and focus.
The Russian twists exercise got its name from exercises developed during the Cold War for the Soviet soldiers.
How to do a Russian twist exercise
Remember to keep your back straight during this exercise and if you are a beginner, keep your foot on the floor. And for advance raise your leg and cross them. Remember to breathe out as you twist your torso.
Starting position: To do the Russian twist exercise the first step is to lie down on a floor with your legs bent at the knees
Create a V shape: upraise your upper body so that it creates a V shape with your thighs.
Twist your torso: Twist your torso to the right as shown in the image and reverse the motion by twisting to the opposite side
Repeat: Repeat these movements till your desired count or set is completed.
benefits of Russian twists
- Rotational Control
- No Equipment
- Isometric Core Strength
- Strengthen Your Obliques
- Increase power potential
Leg Lower
The leg raise is another common and beneficial exercise that makes a rock-solid core and sculpts six-pack abs. There are different variations of this exercise and we will be focusing on its lying leg raises which is a basic one.
The best thing about this exercise is you don’t need any equipment to do this. This exercise basically targets the abdomen, especially the lower abs. Let’s know how to do this exercise, You can use a yoga mat or a carpet for support as per your comfort.
Lie With Your Back Flat: Start this exercise by simply lying flat on the ground facing upward with your legs stretched in front of you. Keep your feet together and put your palms by your side to stabilize your body. Keep your toes pointed at all times during the exercise.
Press Your Lower Back Flat Into The Ground: Keep your lower back flat into the ground to prevent arching and if you can’t keep your lower back flat then put your palm below your butt.
Raise Your Legs Up Towards The Sky
Slowly Lower Your Legs Back Down: Inhale and lower them down until your legs are two to three inches from the ground or mat. You should target to reach as low as you can without touching the ground. your breathing technique is the most important thing: when you raise – exhale and inhale when you put it down
Benefits of leg raise and lowers
- Strengthens Your Hip Flexors
- Fat Burning
- Has Many Variations
- Gives metabolism a boost
- Strengthens your mental endurance
- Burn unwanted calories
Side plank with dips
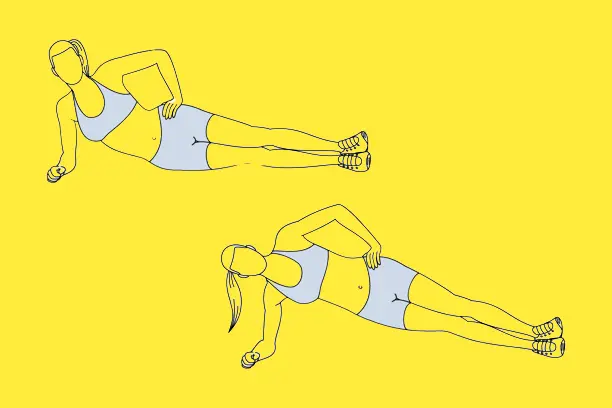
Side plank dips basically target the obliques and our thighs. This exercise is also known as the side plank hip lift. The exercise involves holding your hip up in a plank position and then lowering your hips. This exercise works on your obliques and draws a waistline, In addition to this, you will be improving your muscle control and posture by doing some extra dips.
benefits of a side plank
- Strengthens Your Upper Body Muscles
- Improves Your Spinal Strength and Flexibility
- Improves Body Balance
- Boosts Core Strength
- Helps In Weight Loss
- Strengthen your shoulders, hips, and sides of your core together
Tuck-crunch-extend
starting position: to start this exercise firstly Lie on your back with your knees bent and feet flat on the floor.
posture: after lying on the floor Place your hands behind your head, lightly supporting your neck.
lift your upper body off the ground : Engage your core muscles and lift your upper body off the ground, bringing your chest toward your knees. remember to Exhale when you crunch, and inhale when you lower back down.
- repeat to your desired count
Benefits of the Tuck Crunch
- Easier then sit-ups
- Better Engagement of the Upper Abs
- Safer for the lower back
- Improve posture